Debian12+i3-wm

简介

最近一直在使用Debian12的Xfce桌面,学习Python爬虫的时候电脑性能不够,在开启一个哔哩哔哩和VScode之后就已经卡的不行了,下面我就用这台电脑讲解一下我安装和美化i3-wm的经历。

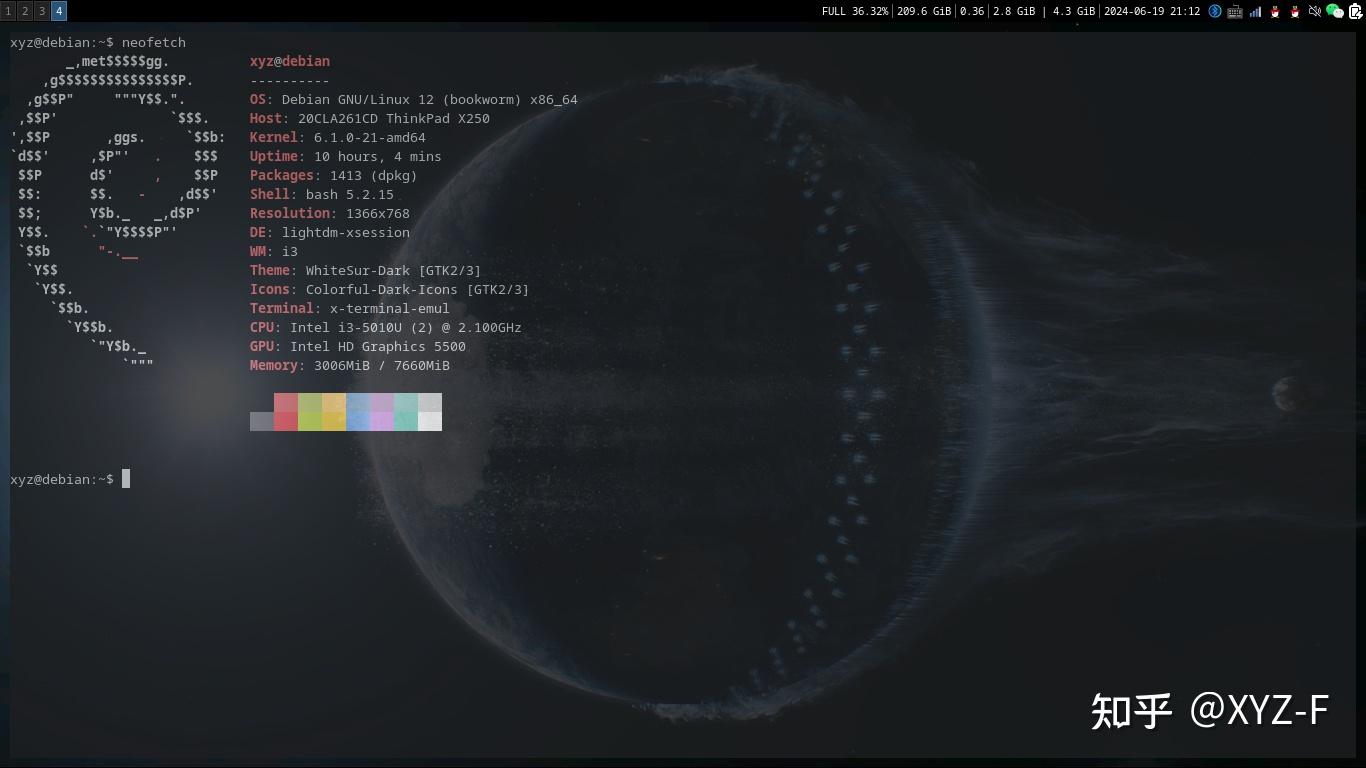
电脑的配置,以及安装i3-wm后的效果


Debian12的安装

我不会用命令行安装Debian12的live版本,所以就使用耗时较长的netinst版本进行安装

镜像下载与写入

点击此链接即可下载镜像。

在Windows系统上,使用Rufus工具写入,此为标准版下载链接。在Linux和Windows系统都可以使用的是ventoy,Windows下载 Linux下载

如果电脑不可以使用,手边正好有一部安卓手机的可以尝试下载EtchDroid,在手机上写镜像。

Debian12网络安装与注意事项

正常引导并进入,正常选择即可。在选择镜像源的时候建议选择清华的,我多次安装只有清华源每次都正常。

选择完软件源后就会出现桌面选择的界面,这里只选择最后一项,也就是标准系统工具即可。

i3-wm的安装与配置

在进入本地系统后就是类似于终端的界面,这里用户名填root,密码就是你自己设置的管理员密码,并非用户密码。

安装

所需要的软件有:

sudo(普通用户调用管理员权限)

lightdm (登录管理器)

i3(i3的所有软件包,只想要窗口管理器的可以选择i3-wm)

Thunar / ranger(文件管理器,thunar是图形界面,ranger是命令行,自行选择即可)

xfce4-terminal / Alacritty (都为终端,xfce4-terminal具有图形界面,自行选择即可)

rofi(图形化drun)

picom(轻量级窗口管理特效的首选)

i3-gaps (i3窗口界面,安装i3的直接跳过即可,只安装i3-wm的需要安装)

i3lock(i3锁屏界面,自行选择是否安装。安装i3的自带)

i3stauts(i3bar中显示时间,电量等信息的小组件。安装i3自带)

network-manager-gnome(gnome网络管理器,用于切换WiFi网络)

xfce4-power-manager(电源管理器)

blueman(蓝牙管理器)

volumeicon-alsa(声音控制)

lxappearance(界面外观更换)

feh(更换壁纸工具)


只需要输入:

1
apt install sudo lightdm i3 ranger alacritty rofi  picom network-manager-gnome xfce4-power-manager blueman volumeicon-alsa lxappearance feh

普通用户使用sudo

1
sudo usermod -aG sudo username

执行完成后输入重启命令即可

1
reboot

i3的常用快捷键

刚进桌面时会让你选择快捷键的Mod键是Windows徽标键或Ctrl键,自行选择即可。

$mod + Enter 启动虚拟终端

$mod + A 焦点转义到父窗口上

$mod + S 堆叠布局

$mod + W 标签布局

$mod + E 默认布局 连续按下 可以从 纵向排列和竖向排列之间 来回切换

$mod + SpaceBar 焦点在平铺式/浮动式转换

$mod + Shift + SpaceBar 窗口在平铺式/浮动式转换

$mod + shift + <数字键> 将当前程序发送到指定window

$mod + <方向键> 移动鼠标到焦点

$mod + shift + <方向键> 移动窗口位置

$mod + D 启动 dmenu

$mod + H 水平分割窗口

$mod + V 垂直分割窗口

$mod + J 焦点往左窗口移

$mod + K 焦点往下窗口移

$mod + L 焦点往上窗口移

$mod + ; 焦点往右窗口移

$mod + Shift + Q 杀死当前窗口的进程

$mod + Shift + E 退出 i3

$mod + Shift + C 当场重新加载 i3config, 无需重启

$mod + Shift + R 重启 i3 (还重新加载了 i3config, 又没有退出过程)

$mod + <数字键> 切换window

$mod + F 焦点窗口全屏

可在i3配置中更换快捷键对应操作

i3的配置与配置文件

配置文件位置在

1
./home/username/.config/i3/config

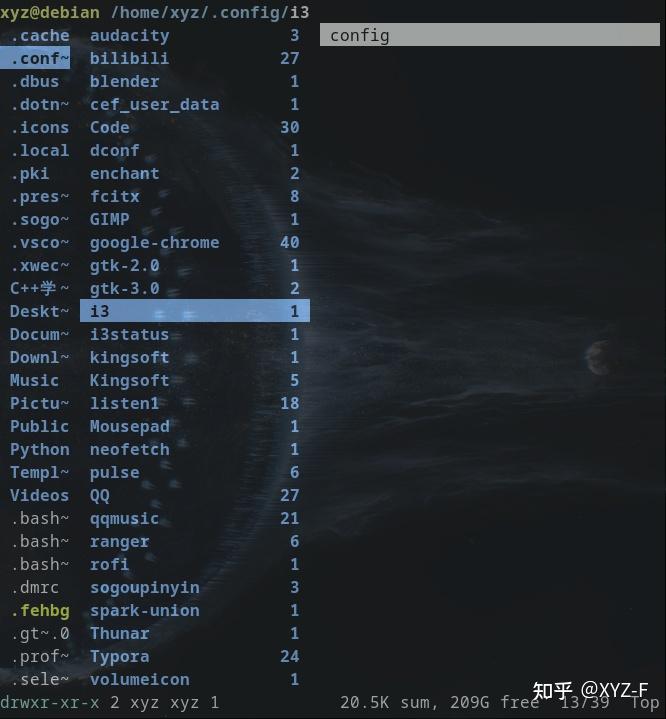
username位置填自己的用户名即可。.config是隐藏文件夹,用Ctrl+H键显示。

ranger中文件位置

将这几条添加进去即可

1
2
3
4
5
6
7
8
9
10
exec --no-startup-id fcitx
exec --no-startup-id xfce4-power-manager
exec --no-startup-id volumeicon
exec --no-startup-id blueman
exec --no-startup-id /usr/lib/policykit-1-gnome/polkit-gnome-authentication-agent-1
new_window none
new_float none
hide_edge_borders both #隐藏窗口边框
gaps inner 8
gaps outer 6

更改dmenu

将原本配置文件改成这样即可

mod + Shift + R 重启 i3


picom配置透明窗口,渐变动画

文件位置(如果没有新建即可):

1
./home/username/.config/picom.conf

这是我的配置文件:

1
2
3
4
5
6
7
8
9
10
11
12
13
14
15
16
17
18
19
20
21
22
23
24
25
26
27
28
29
30
31
32
33
34
35
36
37
38
39
40
41
42
43
44
45
46
47
48
49
50
51
52
53
54
55
56
57
58
59
60
61
62
63
64
65
66
67
68
69
70
71
72
73
74
75
76
77
78
79
80
81
82
83
84
85
86
87
88
89
90
91
92
93
94
95
96
97
98
99
100
101
102
103
104
105
106
107
108
109
110
111
112
113
114
115
116
117
118
119
120
121
122
123
124
125
126
127
128
129
130
131
132
133
134
135
136
137
138
139
140
141
142
143
144
145
146
147
148
149
150
151
152
153
154
155
156
157
158
159
160
161
162
163
164
165
166
167
168
169
170
171
172
173
174
175
176
177
178
179
180
181
182
183
184
185
186
187
188
189
190
191
192
193
194
195
196
197
198
199
200
201
202
203
204
205
206
207
208
209
210
211
212
213
214
215
216
217
218
219
220
221
222
223
224
225
226
227
228
229
230
231
232
233
234
235
236
237
238
239
240
241
242
243
244
245
246
247
248
249
250
251
252
253
254
255
256
257
258
259
260
261
262
263
264
265
266
267
268
269
270
271
272
273
274
275
276
277
278
279
280
281
282
283
284
285
286
287
288
289
290
291
292
293
294
295
296
297
298
299
300
301
302
303
304
305
306
307
308
309
310
311
312
313
314
315
316
317
318
319
320
321
322
323
324
325
326
327
328
329
330
331
332
333
334
335
336
337
338
339
340
341
342
343
344
345
346
347
348
349
350
351
352
353
354
355
356
357
358
359
360
361
362
363
364
365
366
367
368
369
370
371
372
373
374
375
376
377
378
379
380
381
382
383
384
385
386
#################################
# Shadows #
#################################
# 在 Windows 上启用客户端阴影。注意桌面窗口
# (windows with '_NET_WM_WINDOW_TYPE_DESKTOP') 永远不会有阴影,
# 除非使用 wintypes 选项明确要求。
#
# shadow = false
shadow = false;
# 阴影的模糊半径,以像素为单位。 (默认为 12)
# shadow-radius = 12
shadow-radius = 7;
# 阴影的不透明度。 (0.0 - 1.0,默认为 0.75)
# shadow-opacity = .75
# 阴影的左偏移,以像素为单位。 (默认为 -15)
# shadow-offset-x = -15
shadow-offset-x = -7;
# 阴影的顶部偏移量,以像素为单位。 (默认为 -15)
# shadow-offset-y = -15
shadow-offset-y = -7;
# 阴影的红色值(0.0 - 1.0,默认为 0)。
# shadow-red = 0
# 阴影的绿色值(0.0 - 1.0,默认为 0)。
# shadow-green = 0
# 阴影的蓝色值(0.0 - 1.0,默认为 0)。
# shadow-blue = 0
# 阴影的十六进制字符串颜色值(#000000 - #FFFFFF,默认为#000000)。此选项将覆盖选项集阴影-(红色/绿色/蓝色)
# shadow-color = "#000000"
# 指定不应该有阴影的窗口的条件列表。
#
# examples:

# shadow-exclude = "n:e:Notification";

#

# shadow-exclude = []

shadow-exclude = [
"name = 'Notification'",
"class_g = 'Conky'",
"class_g ?= 'Notify-osd'",
"class_g = 'Cairo-clock'",
"_GTK_FRAME_EXTENTS@:c"
];
# 指定不应覆盖阴影的窗口条件列表,例如停靠窗口。
# clip-shadow-above = []
# 指定一个 X 几何图形来描述不应该出现阴影的区域
# 被绘制在,比如一个停靠窗口区域。采用
# shadow-exclude-reg u003d "x10+0+0"
# 例如,如果屏幕底部的 10 个像素不应绘制阴影。
#
# shadow-exclude-reg = ""
# 在特定的 Xinerama 屏幕上将窗口的阴影完全裁剪到屏幕上。
# xinerama-shadow-crop = false

#################################
# Fading #
#################################
# 在打开/关闭和不透明度变化时淡入/淡出窗口,
# unless no-fading-openclose is used.
# fading = false
fading = true;

# 淡入时步骤之间的不透明度变化。(0.01 - 1.0,默认为 0.028)
# fade-in-step = 0.028

fade-in-step = 0.03;
# 淡出时步骤之间的不透明度变化。 (0.01 - 1.0,默认为 0.03)
# fade-out-step = 0.03

fade-out-step = 0.03;
# 淡入淡出步骤之间的时间,以毫秒为单位。 (> 0,默认为 10)
# fade-delta = 10
# 指定不应褪色的窗口条件列表。
# fade-exclude = []
# 不要在窗口打开/关闭时淡入淡出。
# no-fading-openclose = false
# 不要使用 WM 框架淡化被破坏的 ARGB 窗口。解决 Openbox、Fluxbox 等中的错误。
# no-fading-destroyed-argb = false

#################################

# Transparency / Opacity #

#################################
# 非活动窗口的不透明度。 (0.1 - 1.0,默认为 1.0)
# inactive-opacity = 1

inactive-opacity = 0.5;

# 窗口标题栏和边框的不透明度。 (0.1 - 1.0,默认禁用)
# frame-opacity = 1.0

frame-opacity = 0.8;

# 让 -i 设置的非活动不透明度覆盖窗口的 '_NET_WM_WINDOW_OPACITY' 值。
# inactive-opacity-override = true

inactive-opacity-override = false;

# 活动窗口的默认不透明度。 (0.0 - 1.0,默认为 1.0)

active-opacity = 0.8

# 使非活动窗口变暗。 (0.0 - 1.0,默认为 0.0)
# inactive-dim = 0.0
# 指定不应该被视为焦点的窗口的条件列表。
# focus-exclude = []

focus-exclude = [ "class_g = 'Cairo-clock'" ];

# 使用固定的非活动暗度值,而不是根据窗口不透明度进行调整。
# inactive-dim-fixed = 1.0
# 指定不透明度规则列表,格式为 `PERCENT:PATTERN`,
# 像 `50:name *u003d "Firefox"`。建议使用 picom-trans。
# 请注意,我们不保证可能与其他人发生冲突
# 在框架或客户端窗口上设置“_NET_WM_WINDOW_OPACITY”的程序。
# example:
# opacity-rule = [ "80:class_g = 'URxvt'" ];
#
# opacity-rule = []

#################################
# Corners #
#################################

# 设置圆角窗口角的半径。当 > 0 时,合成器将
# 圆窗户的角落。不能很好的互动
# `transparent-clipping`.
corner-radius = 0

# 排除圆角的条件。

rounded-corners-exclude = [
"window_type = 'dock'",
"window_type = 'desktop'"
];

#################################
# Background-Blurring #
#################################
# 背景模糊的参数,请参阅 *BLUR* 部分了解更多信息。
# blur-method =
# blur-size = 12
#
# blur-deviation = false
#
# blur-strength = 5
# 模糊半透明/ARGB 窗口的背景。
# 性能不佳,具有依赖于驱动程序的行为。
# 交换机名称可能会更改,恕不另行通知。
#
# blur-background = false
# 当窗口框架不透明时模糊窗口的背景。
# Implies:
# blur-background
# 性能不佳,具有依赖于驱动程序的行为。名称可能会改变。
#
# blur-background-frame = false
# 使用固定的模糊强度,而不是根据窗口不透明度进行调整。
# 模糊背景固定 = 假
# 指定模糊卷积核,格式如下:
# example:
# blur-kern = "5,5,1,1,1,1,1,1,1,1,1,1,1,1,1,1,1,1,1,1,1,1,1,1,1,1";
#
# blur-kern = ""

blur-kern = "3x3box";

# 排除背景模糊的条件。

# blur-background-exclude = []
blur-background-exclude = [
"window_type = 'dock'",
"window_type = 'desktop'",
"_GTK_FRAME_EXTENTS@:c"
];


#################################
# General Settings #
#################################
# 守护进程。初始化后分叉到后台。导致某些(编写错误的)驱动程序出现问题。
# daemon = false
# 指定要使用的后端:`xrender`、`glx` 或 `xr_glx_hybrid`。
# `xrender` is the default one.
# backend = "glx"

backend = "xrender";

# 启用/禁用垂直同步。
# vsync = false

vsync = true;

# 通过 D-Bus 启用远程控制。有关详细信息,请参阅下面的 *D-BUS API* 部分。
# dbus = false
# 尝试检测 WM 窗口(一个非覆盖重定向窗口,没有
# 具有'WM_STATE'的孩子)并将它们标记为活动。
#
# mark-wmwin-focused = false

mark-wmwin-focused = true;

# 标记没有以“WM_STATE”为焦点的子窗口的覆盖重定向窗口。
# mark-ovredir-focused = false

mark-ovredir-focused = true;

# 尝试检测带有圆角的窗口并且不考虑它们
# 形状的窗户。不幸的是,准确度不是很高。
#
# detect-rounded-corners = false

detect-rounded-corners = true;

# 在客户端窗口上检测'_NET_WM_WINDOW_OPACITY',对窗口管理器很有用
# 不将客户端窗口的“_NET_WM_WINDOW_OPACITY”传递给框架窗口。
#
# detect-client-opacity = false

detect-client-opacity = true;

# 使用 EWMH '_NET_ACTIVE_WINDOW' 来确定当前聚焦的窗口,
# 而不是听 'FocusIn'/'FocusOut' 事件。可能精度更高,
# 前提是 WM 支持它。
#
# use-ewmh-active-win = false
# 如果检测到全屏不透明窗口,则取消重定向所有窗口,
# 最大化全屏窗口的性能。已知会导致闪烁
# 当重定向/取消重定向窗口时。
#
# unredir-if-possible = false
# 取消重定向窗口前的延迟,以毫秒为单位。默认为 0。
# unredir-if-possible-delay = 0
# 不应该被视为非重定向屏幕全屏的窗口条件。
# unredir-if-possible-exclude = []
# 使用 'WM_TRANSIENT_FOR' 对窗口进行分组,并考虑窗口
#在同一组中同时专注。
#
# detect-transient = false

detect-transient = true;

# 使用 'WM_CLIENT_LEADER' 对窗口进行分组,并考虑同一个窗口
# 小组同时聚焦。这通常意味着来自同一应用程序的窗口
# 将同时被视为专注或不专注。
# 如果启用了检测瞬态,'WM_TRANSIENT_FOR' 具有更高的优先级。
#
# detect-client-leader = false
# 将损坏区域的大小调整为特定数量的像素。
# 正值放大,负值缩小。
# 如果值为正,则不会实际绘制那些额外的像素
# 到屏幕,仅用于模糊计算等。 (由于技术限制,
# 使用损坏,这些像素仍然会错误地绘制到屏幕上。)
# 主要用于修复模糊的线路损坏问题,
# 在这种情况下你应该在这里使用模糊半径值
# (例如,对于 3x3 内核,您应该使用 `--resize-damage 1`,
# 使用 5x5 的 `--resize-damage 2`,依此类推)。
# 可能会也可能不会与 *--glx-no-stencil* 一起使用。收缩功能不正常。
#
# resize-damage = 1
# 指定应该用反转颜色绘制的窗口的条件列表。
# 资源占用,并且没有经过很好的测试。
#
# invert-color-include = []

# GLX 后端:避免使用模板缓冲区,如果您没有模板缓冲区,这很有用。
# 在渲染透明内容时可能会导致不正确的不透明度(但绝不会
# 实际上发生了)并且可能不适用于模糊背景。
# 我的测试显示性能提升了 15%。推荐的。
#

glx-no-stencil = true;

# GLX 后端:避免在窗口损坏时重新绑定像素图。
# 可能可以提高快速窗口内容更改的性能,
# 但已知会破坏某些驱动程序(LLVMpipe、xf86-video-intel 等)。
# 如果可行,推荐。
#
# glx-no-rebind-pixmap = false
# 禁用损坏信息。
# 这会导致每次重绘整个屏幕,而不是屏幕的一部分
#实际上已经改变了。可能会降低性能,但可能会修复一些伪影。
# 对立的选项是使用伤害
#
# no-use-damage = false

use-damage = true;

# 使用 X Sync fence 来同步客户端的draw call,确保所有draw
# 调用在 picom 开始绘制之前完成。需要 nvidia 驱动程序
# 为某些用户使用 GLX 后端。
#
# xrender-sync-fence = false

# GLX 后端:使用指定的 GLSL 片段着色器来渲染窗口内容。
# 参见 `compton-default-fshader-win.glsl` 和 `compton-fake-transparency-fshader-win.glsl`
# 在源代码树中作为示例。
#
# glx-fshader-win = ""

# 强制所有窗口使用混合进行绘制。如果你有用
# 有一个 glx-fshader-win 可以把不透明的像素变成透明的。
#
# force-win-blend = false
# 不要使用 EWMH 检测全屏窗口。
# 恢复为仅根据其大小和坐标检查窗口是否为全屏。
#
# no-ewmh-fullscreen = false
# 调暗明亮的窗户,使其亮度不超过此设定值。
# 窗口的亮度是通过平均窗口中的所有像素来估计的,
# 所以这可能会带来性能损失。
# 将此设置为 1.0 会禁用此行为。需要禁用 --use-damage。 (默认值:1.0)
#
# max-brightness = 1.0
# 让透明窗口像非透明窗口一样剪辑其他窗口,
# 而不是在它们之上混合。
#
# transparent-clipping = false
# 设置日志级别。可能的值为:
# "trace", "debug", "info", "warn", "error"
# 越来越重要。大小写无关紧要。
# 如果使用“TRACE”日志级别,最好登录到文件中
# 使用 *--log-file*,因为它可以生成大量日志。
#
# log-level = "debug"

log-level = "warn";

# 设置日志文件。
# 如果 *--log-file* 从未指定,日志将被写入标准错误。
# 否则,日志将写入给定文件,尽管一些早期的
# 日志可能仍会写入标准错误。
# 从配置文件中设置此选项时,建议使用绝对路径。
#
# log-file = "/path/to/your/log/file"
# 显示所有 X 错误(用于调试)
# show-all-xerrors = false
# 将进程 ID 写入文件。
# write-pid-path = "/path/to/your/log/file"
# 窗口类型设置
#
# 'WINDOW_TYPE' 是 EWMH 标准中定义的 15 种窗口类型之一:
# "unknown", "desktop", "dock", "toolbar", "menu", "utility",
# "splash", "dialog", "normal", "dropdown_menu", "popup_menu",
# "tooltip", "notification", "combo", and "dnd".
#

# 以下每个窗口类型选项可用:::
#
# fade, shadow:::
# Controls window-type-specific shadow and fade settings.
#
# opacity:::
# Controls default opacity of the window type.
#
# focus:::
# Controls whether the window of this type is to be always considered focused.
# (By default, all window types except "normal" and "dialog" has this on.)
#
# full-shadow:::
# Controls whether shadow is drawn under the parts of the window that you
# normally won't be able to see. Useful when the window has parts of it
# transparent, and you want shadows in those areas.
#
# clip-shadow-above:::
# Controls wether shadows that would have been drawn above the window should
# be clipped. Useful for dock windows that should have no shadow painted on top.
#
# redir-ignore:::
# Controls whether this type of windows should cause screen to become
# redirected again after been unredirected. If you have unredir-if-possible
# set, and doesn't want certain window to cause unnecessary screen redirection,
# you can set this to `true`.
#
wintypes:
{
tooltip = { fade = true; shadow = false; opacity = 0.75; focus = true; full-shadow = false; };
dock = { shadow = false; clip-shadow-above = true; }
dnd = { shadow = false; }
popup_menu = { opacity = 0.8; }
dropdown_menu = { opacity = 0.8; }
};

安装后软件安装

浏览器安装

我是直接终端下载Chrome的deb安装包安装

1
wget https://dl.google.com/linux/direct/google-chrome-stable_current_amd64.deb

然后本地安装

1
sudo apt install google*.deb

spark store安装

打开浏览器并访问其官网或点此下载4.2.12的amd64安装包

然后打开终端

1
2
3
cd ./Download

sudo apt install spark*.deb

随后使用Mod+D即可找到星火商店。

Alacritty

配置文件的位置在/home/username/.config/alacritty/alacritty.yml(若不存在可自行创建)

下面是我的配置,使用前要安装JetBrains Mono字体

1
2
3
4
5
6
7
8
9
10
11
12
13
14
15
16
17
18
19
20
21
22
23
24
25
26
27
28
29
30
31
32
33
34
35
36
37
38
39
40
41
42
43
44
45
46
47
48
49
50
51
52
53
54
55
56
57
58
59
60
61
62
63
64
65
66
67
68
69
70
71
72
73
74
75
76
77
78
79
80
81
82
83
84
85
86
87
88
89
90
91
92
93
94
95
96
97
98
99
100
101
102
103
104
105
106
107
108
109
110
111
112
113
114
115
116
117
118
119
120
121
122
123
# Colors (Aura Theme)
colors:
  # Default colors
  primary:
    background: '#15141b'
    foreground: '#edecee'

  cursor:
    cursor: '#00D1FF'

  selection:
    bash: CellForeground
    background: '#29263c'

  # Normal colors
  normal:
    black: '#110f18'
    red: '#ff6767'
    green: '#61ffca'
    yellow: '#ffca85'
    blue: '#a277ff'
    magenta: '#a277ff'
    cyan: '#61ffca'
    white: '#edecee'

  # Bright colors
  bright:
    black: '#4d4d4d'
    red: '#ff6767'
    green: '#61ffca'
    yellow: '#ffca85'
    blue: '#a277ff'
    magenta: '#a277ff'
    cyan: '#61ffca'
    white: '#edecee'

  search:

    matches:
      foreground: '#000000'
      background: '#ffffff'
    focused_match:
      foreground: '#ffffff'
      background: '#00D1FF'

# 设置字体
font:
  normal:
    family: 'JetBrains Mono'
    style: Regular

  bold:
    family: 'JetBrains Mono'
    style: Regular

  italic:
    family: 'JetBrains Mono'
    style: Italic

  bold_italic:
    family: 'JetBrains Mono'
    style: Italic

  # 字大小
  size: 8

  offset:
    x: 0
    y: 1

  glyph_offset:
    x: 0
    y: 1


window:
  padding:
    x: 22
    y: 22

  decorations: transparent

  dimensions:

    columns: 80
    lines: 25


scrolling:
  # 回滚缓冲区中的最大行数,指定“0”将禁用滚动。
  history: 100000
  # 滚动行数
  multiplier: 4


cursor:
  style:
    shape: Beam

# 如果为‘true’,则使用亮色变体绘制粗体文本。
draw_bold_bash_with_bright_colors: false

selection:
  semantic_escape_chars: ',│`|:"'' ()[]{}<>'
  save_to_clipboard: true

live_config_reload: true
key_bindings:
  - { key: R, mods: Command, mode: ~Vi|~Search, chars: "\x0c" }
  - { key: R, mods: Command, mode: ~Vi|~Search, action: ClearHistory }
  - { key: W, mods: Command, action: Hide }
  - { key: W, mods: Command|Shift, action: Quit }
  - { key: N, mods: Command, action: SpawnNewInstance }
  - { key: T, mods: Command, action: CreateNewWindow }
  - { key: Left, mods: Alt, chars: "\x1bb" } # Skip word left
  - { key: Right, mods: Alt, chars: "\x1bf" } # Skip word right
  - { key: Left, mods: Command, chars: "\x01" } # Home
  - { key: Right, mods: Command, chars: "\x05" } # End
  - { key: Back, mods: Command, chars: "\x15" } # Delete line
  - { key: Back, mods: Alt, chars: "\x1b\x7f" } # Delete word

Ranger

1
输入:ranger --copy-config=all

在./home/username/.config/ranger/rc.conf中可以调整字体的大小

Redshift

在./home/username/.config目录下新建redshift.conf

下面是我的配置文件:

1
2
3
4
5
6
7
8
9
10
11
12
13
14
15
16
17
18
19
20
21
22
23
24
25
26
27
28
29
30
31
32
33
34
35
36
37
38
39
40
41
42
43
44
45
46
47
48
49
50
51
52
53
; Global settings for redshift

[redshift]
; Set the day and night screen temperatures
temp-day=5000
temp-night=3500
; Enable/Disable a smooth transition between day and night
; 0 will cause a direct change from day to night screen temperature.
; 1 will gradually increase or decrease the screen temperature.
transition=1
; Set the screen brightness. Default is 1.0.
;brightness=0.9
; It is also possible to use different settings for day and night
; since version 1.8.
;brightness-day=0.7
;brightness-night=0.4
; Set the screen gamma (for all colors, or each color channel
; individually)
gamma=0.8
;gamma=0.8:0.7:0.8
; This can also be set individually for day and night since
; version 1.10.
;gamma-day=0.8:0.7:0.8
;gamma-night=0.6
; Set the location-provider: geoclue, geoclue2, manual
; type redshift -l list to see possible values.
; The location provider settings are in a different section.
location-provider=manual
; Set the adjustment-method: randr, vidmode
; type redshift -m list to see all possible values.
; randr is the preferred method, vidmode is an older API.
; but works in some cases when randr does not.
; The adjustment method settings are in a different section.
adjustment-method=randr
; Configuration of the location-provider:
; type redshift -l PROVIDER:help to see the settings.
; ex: redshift -l manual:help
; Keep in mind that longitudes west of Greenwich (e.g. the Americas)
; are negative numbers.

[manual]
lat=22.5
lon=88.3
; Configuration of the adjustment-method
; type redshift -m METHOD:help to see the settings.
; ex: redshift -m randr:help
; In this example, randr is configured to adjust screen 1.
; Note that the numbering starts from 0, so this is actually the
; second screen. If this option is not specified, Redshift will try
; to adjust _all_ screens.
[randr]
screen=0

Vim

在./home/username目录下新建.vimrc文件

下面是我的配置文件:

1
2
3
4
5
6
7
8
9
10
11
12
13
14
15
"=========================================================================
"
"" 根据他人配置进行增加个性化设置
"
""=========================================================================

map <F3> :Explore<CR>
map <S-F3> :Vexplore<CR>
map <C-F3> :Sexplore<CR>

imap jk <Esc>

nmap <space> :

syntax on

Debian12+i3-wm
https://blog.ivoinkwell.xyz/linux-exploration/debian12-i3-wm/
作者
Ivo
发布于
2026年3月15日
许可协议